새소식
300x250
안녕하세요. 갓대희 입니다. 이번 포스팅은 [ 스프링 부트 View 설정방법 ] 입니다. : )

이번 포스팅에선 MVC 패턴중 View 설정하는 방법을 설명하려 한다. 그리고 JSP 및 VelocityThymeleaf를 예제를 포함 하려 한다.
0. 들어가기 앞서
- 스프링 공식문서에 보면 내장된 서블릿 컨테이너에는 jsp 제한사항이 있다.
https://docs.spring.io/spring-boot/docs/current/reference/html/spring-boot-features.html#boot-features-developing-web-applications
- 스프링 부트는 가능하다면 jsp를 피하고 Thymeleaf와 같은 템플릿 엔진을 사용하라고 권장한다.
7.1.10. Template Engines
As well as REST web services, you can also use Spring MVC to serve dynamic HTML content.
Spring MVC supports a variety of templating technologies, including Thymeleaf, FreeMarker, and JSPs.
Also, many other templating engines include their own Spring MVC integrations.
Spring Boot includes auto-configuration support for the following templating engines:
FreeMarker, Groovy, Thymeleaf, Mustache
If possible, JSPs should be avoided. There are several known limitations when using them with embedded servlet containers.
7.4.5. JSP Limitations
When running a Spring Boot application that uses an embedded servlet container
(and is packaged as an executable archive), there are some limitations in the JSP support.
With Jetty and Tomcat, it should work if you use war packaging.
An executable war will work when launched with java -jar, and will also be deployable to any standard container.
JSPs are not supported when using an executable jar.
Undertow does not support JSPs.
Creating a custom error.jsp page does not override the default view for error handling. Custom error pages should be used instead.
1. Spring Boot에서의 View
ㆍJSP/JSTL
ㆍThymeleaf
ㆍFreeMarker
ㆍVelocity
ㆍGroovy Template Engine
ㆍTiles
... etc
※ 앞서 포스팅에서 기본 프로젝트 구조를 잡았을 것이다
src > main > reousrce > [static] 폴더엔 정적 리소스들을 추가하였을 것이다.
src > main > reousrce > [templates] 폴더도 확인할 수 있을 것인데 Thymeleaf(.html), Velocity(.vm)등과 관련된 파일만 동작하고 jsp 파일은 추가하여도 작동하지 않으니 참고 하자.
※ 폴더 구조
src
└─ main
└─ resource
└─ templates (View: Thymeleaf, Groovy, Velocity 등)
└─ static (정적 컨텐츠 : html, css, js, image 등)
- 스프링부트는 웹 개발을 위해 자주 사용되는 Spring의 Component들과 Tomcat, Jetty 등의 경량 웹 어플리케이션 서버를 통합한 경량의 웹개발 프레임 워크이다.
- 즉 별도의 웹 어플리케이션 서버 없이 SpringBoot를 통해 프레임워크와 웹 어플리케이션 서버를 통합했다고 생각하면 된다.
앞서 포스팅에서 다음 디펜던시(spring-boot-starter-web)를 추가 하였을 것이다.
<dependency>
	<groupId>org.springframework.boot</groupId>
	<artifactId>spring-boot-starter-web</artifactId>
</dependency>
spring-boot-starter-web 에는 tomcat이 포함되어 있지만, JSP 엔진은 포함하고 있지 않다.
물론 간단한 설정만 해주면 JSP view를 사용 가능하다. 하기 디펜던시를 추가 하자.
- gradle
implementation 'org.apache.tomcat.embed:tomcat-embed-jasper'
- pom.xml
<dependency>
	<groupId>org.apache.tomcat.embed</groupId>
	<artifactId>tomcat-embed-jasper</artifactId>
	<scope>provided</scope>
</dependency>
"JSTL"
2. pom.xml / gradle 설정
- SpringBoot Major Version이 변경 되었으니
Spring 3.0 관련 설정 내용을 새로 작성하기보다, 해당 글 springBoot 2.0에서의 jstl 설정 글에 추가하였다.
https://github.com/spring-projects/spring-boot/wiki/Spring-Boot-3.0-Migration-Guide#jakarta-ee
- 3.0부터 Tomcat 10버전으로 변경 되었고, 이와 관련하여 servlet 관련 패키지도 변경되었다.
( javax.servlet > jakarta.servlet )
- 때문에 예전의 경우 javax.servlet을 추가해 줬지만, springBoto 3.0에서는 jakarta.servlet 관련 디펜던시를 추가하여야 한다.
//스프링부트 3.0 이상
implementation 'jakarta.servlet:jakarta.servlet-api:6.0.0'
implementation 'jakarta.servlet.jsp.jstl:jakarta.servlet.jsp.jstl-api:3.0.0'
implementation 'org.glassfish.web:jakarta.servlet.jsp.jstl:3.0.1'
implementation 'javax.servlet:jstl:1.2'
- jasper,jstl을 의존성에 추가해야 JSP파일의 구동이 가능하다.
(앞서 말했듯이 jsp 파일은 Springboot의 templates 폴더안에서 작동하지 않으니 참고하자.)
<dependency>
	<groupId>javax.servlet</groupId>
	<artifactId>jstl</artifactId>
</dependency>
3. JSP 경로 설정(디렉토리 생성)
- WEB-INF/jsp/(또는 WEB-INF/views/)
(full 경로를 말씀해달라고 하시는 분들이 있어 추가하자면 다음과 같습니다.
/src/main/webapp/WEB-INF/jsp/)
- 톰캣기반 자바 웹어플리케이션에서는 보안상 jsp 위치를 URL로 직접접근할 수 없는 WEB-INF폴더 아래 위치시킨다.
ex) test.jsp
<%@ page language="java" contentType="text/html; charset=UTF-8" pageEncoding="UTF-8"%>
<%@ taglib prefix="c" uri="http://java.sun.com/jsp/jstl/core"%>
<!DOCTYPE html>
<html lang="ko">
<head>
<meta http-equiv="Content-Type" content="text/html; charset=UTF-8">
<title>View Test Page</title>
</head>
<body>
	<h2>Hello! ${name}</h2>
	<div>JSP List Test</div>
        <c:forEach var="item" items="${list}" varStatus="idx">
        ${idx.index}, ${item} <br />
        </c:forEach>
</body>
</html>
4. application.properties
※ Spring 애플리케이션 시작시 application.properties 파일에 정의된 내용을 로드한다.
(스프링부트의 AutoConfiguration을 통해 자동 설정한 속성값들이 존재하며, application.properties의 해당 값들은 오버라이드 한다.)
- 별다른 설정을 하지 않으면 default 포트는 8080이다.
- Spring Boot에 기본적으로 내장되어있는 Tomcat과 Jetty와 같은 WAS의 포트번호를 임의로 변경 할 수 있다.
server.port = 8888
- jsp 페이지를 처리하기 위한 prefix와 suffix를 application.properties에 추가 하자.
- 앞서 생성한 JSP 경로를 prefix로 선언, 그리고 확장자럴 suffix로 선언할 수 있다.
spring.mvc.view.prefix=/WEB-INF/jsp/
spring.mvc.view.suffix=.jsp
5. Controller 설정
@RequestMapping("/test")
public ModelAndView test() throws Exception{
	ModelAndView mav = new ModelAndView("test");
	mav.addObject("name", "goddaehee");

	List<String> testList = new ArrayList<String>();
	testList.add("a");
	testList.add("b");
	testList.add("c");

	mav.addObject("list", testList);
	return mav;
}
6. jsp파일 서버 재시작 없이 바로 적용하기
- 스프링 부트는 스프링 프로젝트와 다르게, 동적 파일들의 파일 변경을 자동으로 반영하지 않는다.
- 기존 스프링과 동일하게 자동 반영하기 위해선 다음과 같은 설정을 추가하여 주면 된다.
// https://mvnrepository.com/artifact/org.springframework.boot/spring-boot-devtools
// implementation 불필요
// implementation group: 'org.springframework.boot', name: 'spring-boot-devtools', version: '2.7.1'

// 개발용으로 충분하다.
developmentOnly 'org.springframework.boot:spring-boot-devtools'
<dependency>
	<groupId>org.springframework.boot</groupId>
	<artifactId>spring-boot-devtools</artifactId>
</dependency>
devtools.livereload.enabled=true
※ 참고 Spring Boot 1.x 버전 기준으로는 application.properties에 다음 내용을 추가해주면 적용된다.
server.jsp-servlet.init-parameters.development=true
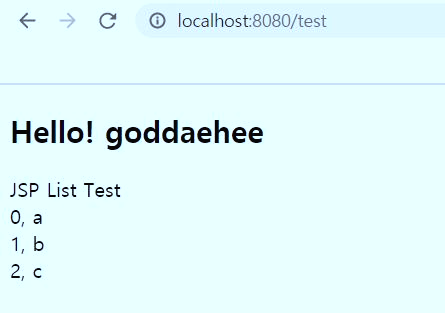
◎ Application을 실행하여 보자. 다음과 같은 화면을 볼 수 있다.
- jstl 관련하여 다음과 같은 오류가 발생할 경우 상기 springBoot 버전과 디펜던시 점검을 해보자.
The absolute uri: [http://java.sun.com/jsp/jstl/core] cannot be resolved in either web.xml or the jar files deployed with this application
org.apache.jasper.JasperException: The absolute uri: [http://java.sun.com/jsp/jstl/core] cannot be resolved in either web.xml or the jar files deployed with this applicationjava.lang.NoClassDefFoundError: javax/servlet/jsp/tagext/TagLibraryValidator- SpringBoot 3.0 에서 jsp를 적용하다보면, 위와 같은 에러를 볼 수 있을텐데, 거의 90%이상 해당 라이브러리를 사용하고 있을 수 있다.
implementation 'javax.servlet:jstl:1.2'
- 이 경우, 위에 작성해둔대로 springBoot 따라 Tomcat 버전이 다르기 때문에, 다음과 같이 library 교체를 해주도록 하자.
implementation 'jakarta.servlet:jakarta.servlet-api:6.0.0'
implementation 'jakarta.servlet.jsp.jstl:jakarta.servlet.jsp.jstl-api:3.0.0'
implementation 'org.glassfish.web:jakarta.servlet.jsp.jstl:3.0.1'
"thymeleaf"
7. thymeleaf
Thymeleaf 공홈
- https://www.thymeleaf.org/index.html
Thymeleaf + Spring
- https://www.thymeleaf.org/doc/tutorials/3.0/thymeleafspring.html
- build.gradle
implementation 'org.springframework.boot:spring-boot-starter-thymeleaf'
- pom.xml
<dependency>
	<groupId>org.springframework.boot</groupId>
	<artifactId>spring-boot-starter-thymeleaf</artifactId>
</dependency>
- 경로 : /src/main/resources/templates/thymeleaf

- 파일명 : thymeleafTest.html
<html lang="ko" xmlns:th="http://www.thymeleaf.org">
<head>
<meta http-equiv="Content-Type" content="text/html; charset=UTF-8">
<title>Hello thymeleaf</title>
</head>
<body>
	<h1>Hello thymeleaf</h1>
	<h2>name = <span th:text="${testModel.name}"></span></h2>
	<h3>id =  <span th:text="${testModel.id}"></span></h3>
</body>
</html>#JSP와 같이 사용할 경우 뷰 구분을 위해 컨트롤러가 뷰 이름을 반환할때 thymeleaf/ 로 시작하면 타임리프로 처리하도록 view-names 지정
spring.thymeleaf.view-names=thymeleaf/*
spring.thymeleaf.prefix=classpath:/templates/
spring.thymeleaf.suffix=.html
#thymeleaf를 사용하다 수정 사항이 생길 때 수정을 하면 재시작을 해줘야 한다. 이를 무시하고 브라우저 새로고침시 수정사항 반영을 취해 cache=false 설정(운영시는 true)
spring.thymeleaf.cache=false
spring.thymeleaf.check-template-location=truepackage com.god.bo.test.vo;
public class TestVo {
private Long mbrNo;
private String id;
private String name;
public TestVo() {
}
public TestVo(String id, String name) {
this.id = id;
this.name = name;
}
public Long getMbrNo() {
return mbrNo;
}
public void setMbrNo(Long mbrNo) {
this.mbrNo = mbrNo;
}
public String getId() {
return id;
}
public void setId(String id) {
this.id = id;
}
public String getName() {
return name;
}
public void setName(String name) {
this.name = name;
}
}
@RequestMapping("/thymeleafTest")
public String thymeleafTest(Model model) {
    TestVo testModel = new TestVo("goddaehee", "갓대희") ;
    model.addAttribute("testModel", testModel);
    return "thymeleaf/thymeleafTest";
}

스프링부트를 이용해 아주 간단히 View 설정해 보았다.
| [스프링부트 (7)] Spring Boot JPA(1) - 시작 및 기본 설정 (16) | 2020.02.23 |
|---|---|
| [스프링부트 (6)] Spring Boot 로그 설정(2) - DB로그(log4jdbc) (7) | 2020.02.16 |
| [스프링부트 (5)] Spring Boot 로그 설정(1) - Logback (22) | 2020.02.16 |
| [스프링부트 (4)] Spring Boot DataBase 연동하기 (MariaDB, MyBatis, HikariCP) (14) | 2020.02.12 |
| [스프링부트 (2)] SpringMVC(1) Controller 생성하기 (6) | 2020.02.04 |
소중한 공감 감사합니다