새소식
300x250
안녕하세요. 갓대희 입니다. 이번 포스팅은 [ 스프링 부트 기초. 스프링 부트란? 그리고 스프링 부트 프로젝트 생성 방법 ] 입니다. : )
스프링 부트가 나온지 어느덧 꽤 많은 시간이 흐른것 같다. 계속 해오던 쇼핑몰 운영 업무를 해오다 보니 스프링 부트를 제대로 사용할 일이 없어, 이번 잠시 주어진 휴식 기간에 스프링 부트에 대한 내용을 정리해 보려 한다.
운영 업무를 하다보면 쓰던 기술, 해오던 업무에 익숙하고 무언가의 불안함이 생긴다. 다시 SI를 하고 싶은 마음도 간간히 생기기도 하고.. 주저리 그만하고 스프링 부트에 대해 알아보자.

1. SpringBoot 기초
- 스프링 프레임워크를 사용하는 프로젝트를 아주 간편하게 설정할 수 있는 스프링 프레임웍의 서브 프로젝트라고 할 수 있다.
- Spring Boot makes it easy to create stand-alone.
단독실행가능한 스프링애플리케이션을 생성한다.
- Most Spring Boot applications need very little Spring configuration.
Spring Boot는 최소한의 초기 스프링 구성으로 가능한 한 빨리 시작하고 실행할 수 있도록 설계되었다.
- 웹 컨테이너를 내장하고 있어 최소한의 설정으로 쉽게 웹 어플리케이션을 만들 수 있다.
※ 스프링 프레임 워크와 비교하여 여러 가지 장점이 있다.
- 스프링 프레임 워크를 사용 하면 많은 XML 설정파일등을 작성 하는 등 설정하는 방법이 어려운 편이기 때문에 보통 검색을 통해 설정 내용을 복사 하거나, 기존 설정파일들을 복붙하기 일수였다.
하지만 스프링 부트는 반복되는 개발환경 구축을 위한 코드작성등의 노력을 줄여주고 쉽고 빠르게 프로젝트를 설정할 수 있도록 도와준다.
- 매우 빠르게 모든 스프링 개발에 관한 경험에 광범위한 접근을 제공한다.
- 프로젝트 환경 구축에서 큰 영역을 차지하는 비기능적인 기능들을 기본적으로 제공한다.
(내장형 서버, 시큐리티, 측정, 상태 점검, 외부 설정)
등등 다양한 장점을 갖고 있지만, 무엇보다 스프링 부트를 직접 사용해보고 체감해보는 것이 빠를 것 같다. 그럼 이제 직접 스프링 부트 프로젝트를 생성해 보자.
2. 스프링 부트 시작하기
- 요즘은 이클립스, 인텔리 제이 등을 통해 쉽게 스프링, 스프링 부트 프로젝트를 시작할 수 있기도 하다.
- 스프링 이니셜라이즈로 쉽게 스프링 부트 프로젝트를 생성 해보자.
- 해당 싸이트는 개속 버전업, 리뉴얼 되고 있지만, 얼추 큰 틀은 같다.
1.1 스프링 이니셜라이즈 사이트 접속
- 다음 그림을 참고하여 설정 할 예정이다. 자세한 내용은 그림 하단 내용 참고.
- 현재 2023. 2월 설정 시 initializr - 3.0.2
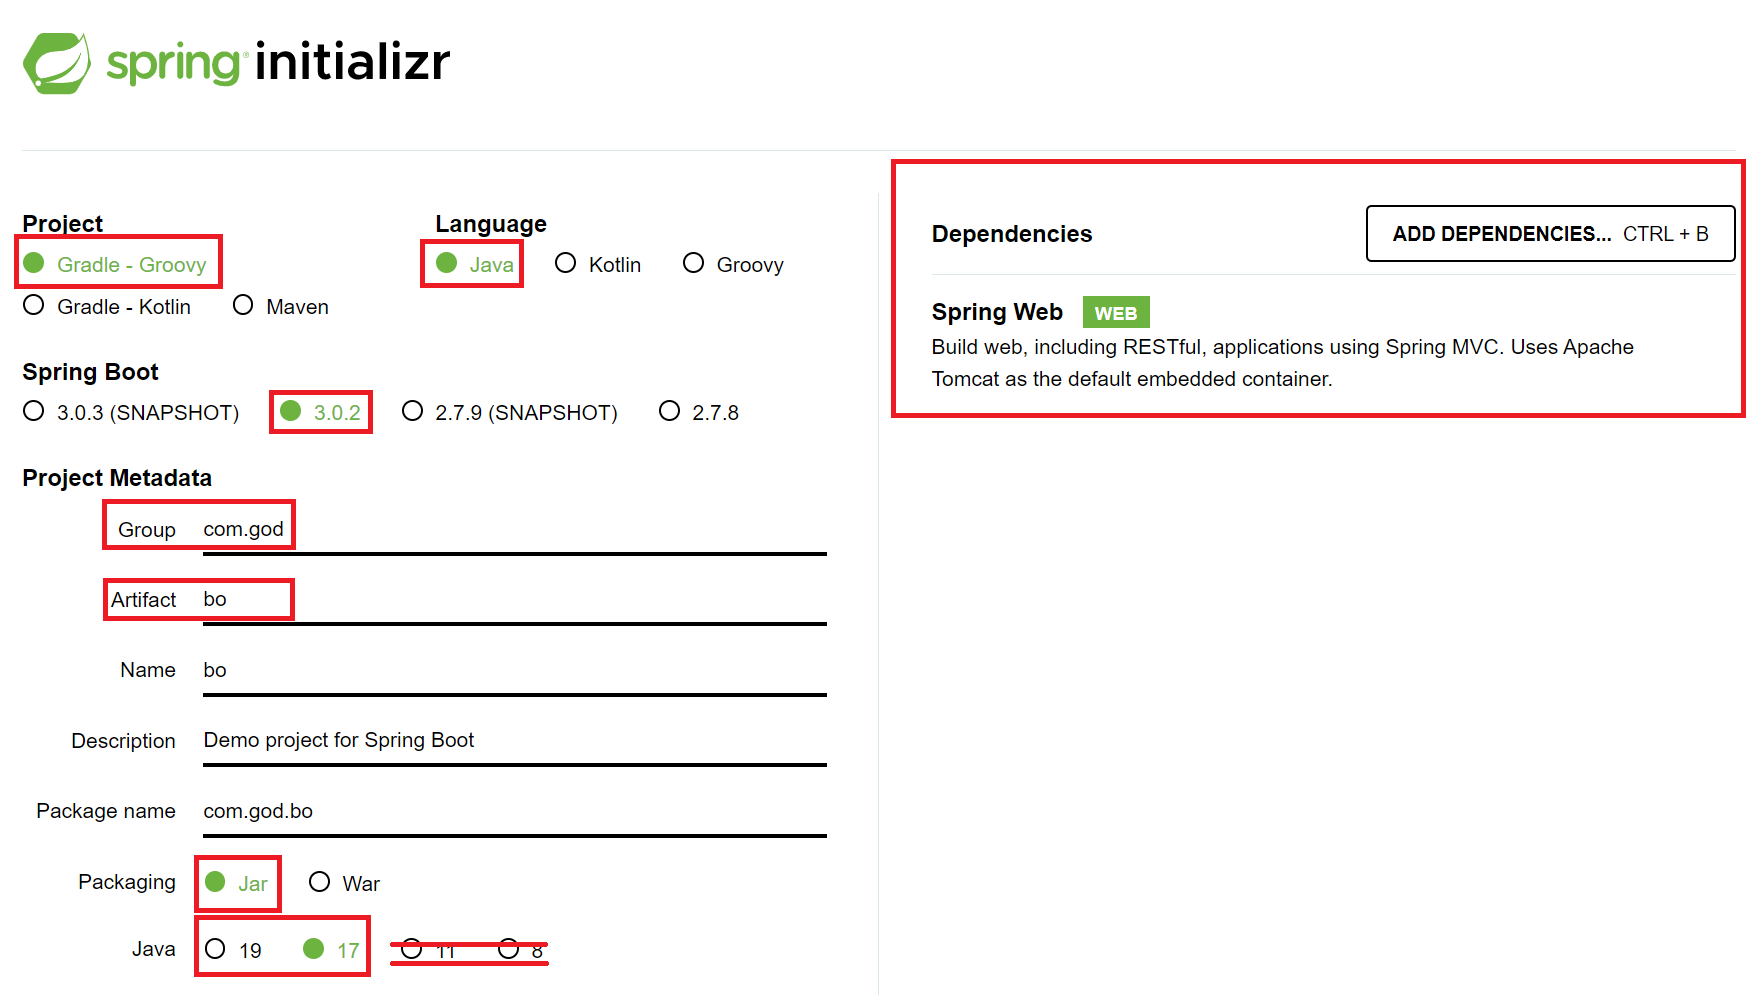
- Spring boot 3.0부터는 Java 17부터 지원한다.
- 예전 spring boot 2.x 대 / Maven으로 설정한 내용은 참고로 제일 하단에 기록으로 남겨 두도록 한다.
- 프로젝트, GroupId, Artifact ID, 패킹, 자바 버전 등을 설정 하여 주자.
- Dependencies는 Spring Web 을 추가 해주도록 한다. (지금 설정하지 않더라도 build.gradle 에서 설정해주면 된다.)
★ GroupId : GroupId는 자신의 프로젝트를 식별해주는 고유 아이디.
'com.godDaeHee.web' 과 같이 인터넷 주소를 뒤집어 써놓은 형태.
★ ArtifactId : ArtifactId는 버전 정보를 생략한 이름(jar).
보통 프로젝트 ID와 동일하게 작성한다.
나는 'com.god.bo'라는 GroupId를 사용할 예정이다. GroupId는 'com.god', ArtifactId는 'bo'로 설정 해보도록 하겠다.
Generate - Ctrl + Enter 를 클릭하면 프로젝트 파일이 압축되어 다운로드 된다.
이를 압축 해제 하도록 하자.
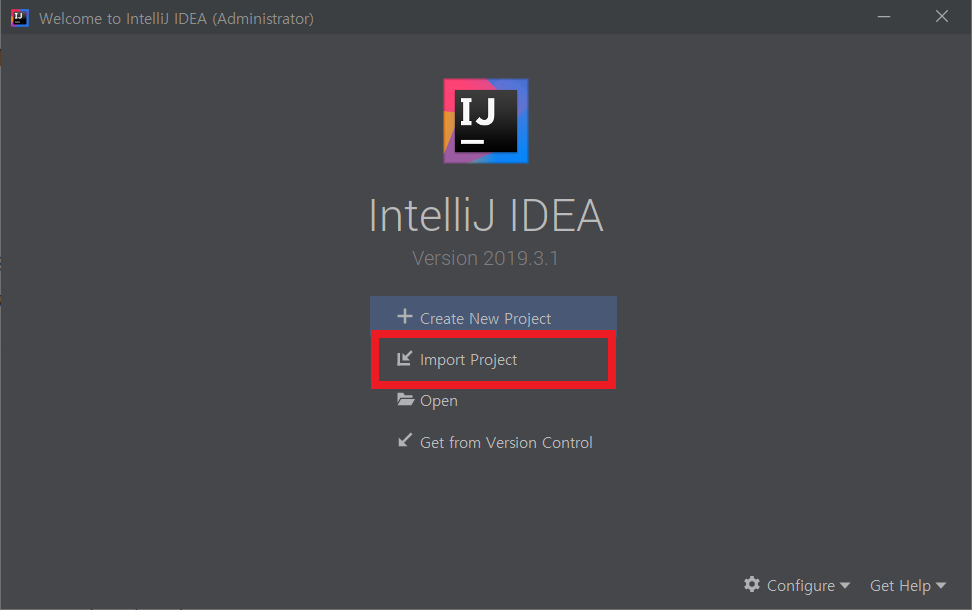
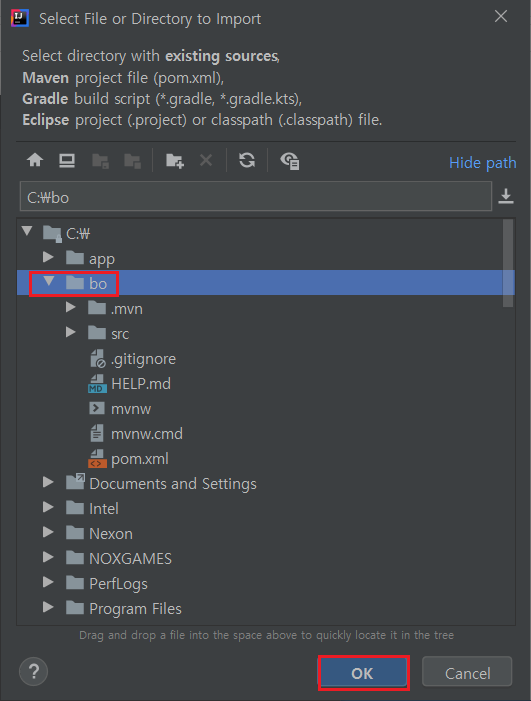
1.2 프로젝트 Import
- 이클립스나 인텔리제이를 통해 압축 해제한 프로젝틀르 임폴드 해준다.
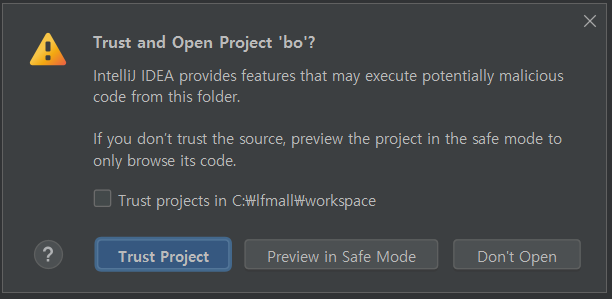
- 이니셜 라이저를 통해 프로젝트 생성이 완료 되었다.
★ 2.1 spring-boot-starter-web
- Spring MVC를 사용한 RESTful서비스를 개발하는데 사용.
implementation 'org.springframework.boot:spring-boot-starter'
★ 2.2 spring-boot-starter-test
- Junit, Hamcrest, Mockito를 포함하는 스프링 어플리케이션을 테스트 가능하도록 한다.
testImplementation 'org.springframework.boot:spring-boot-starter-test'
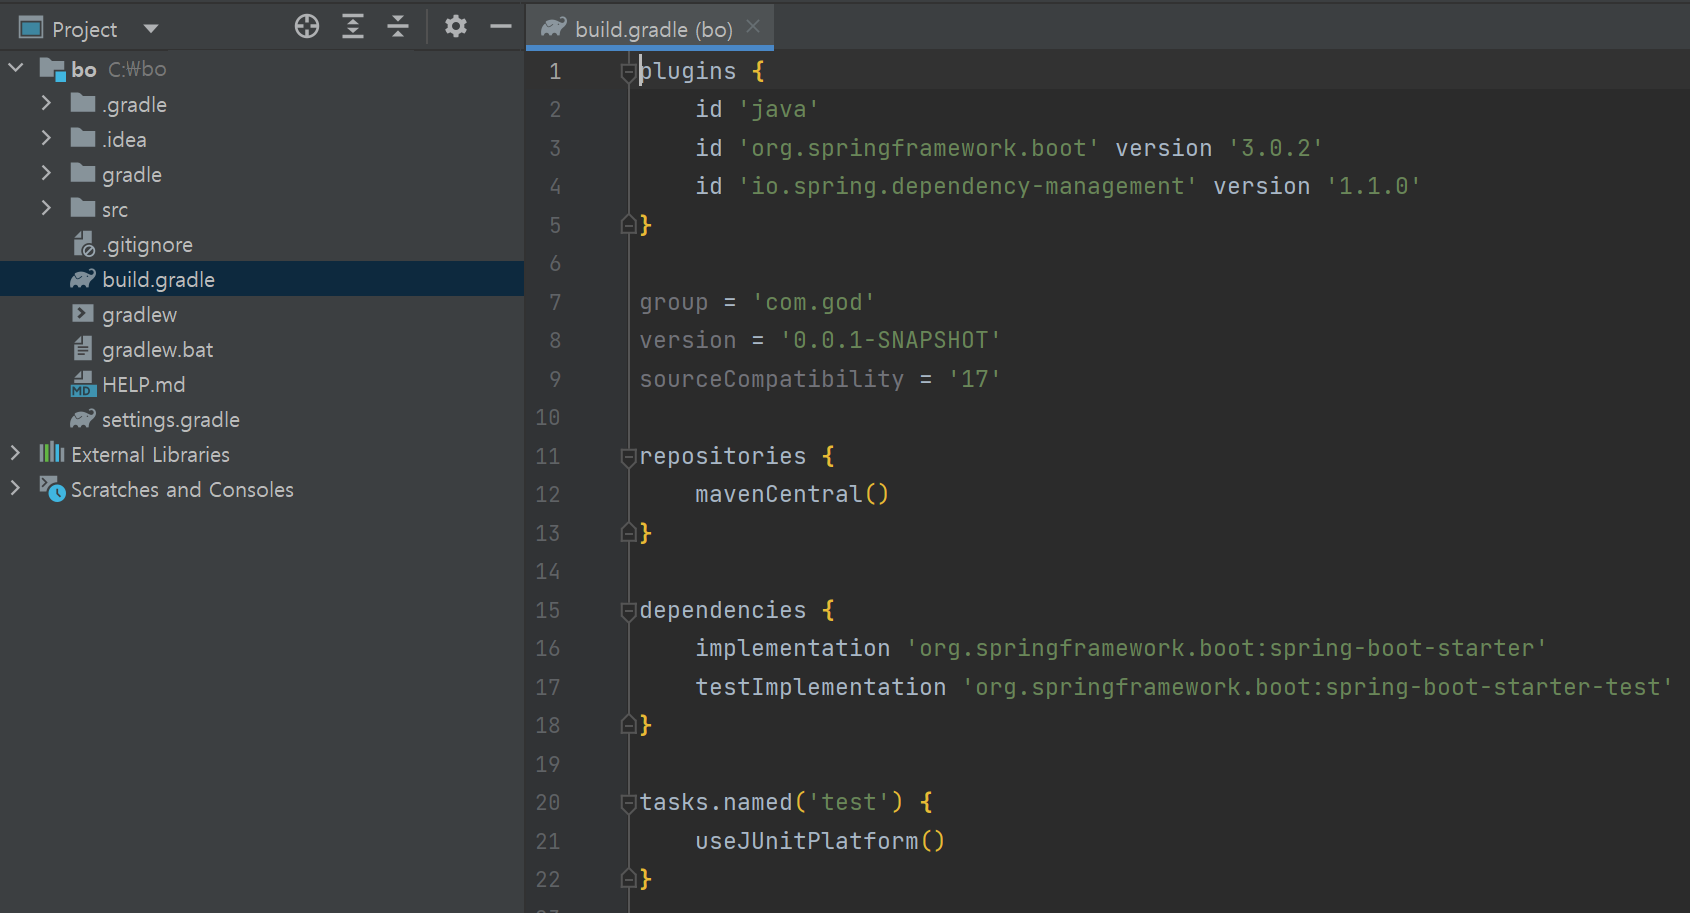
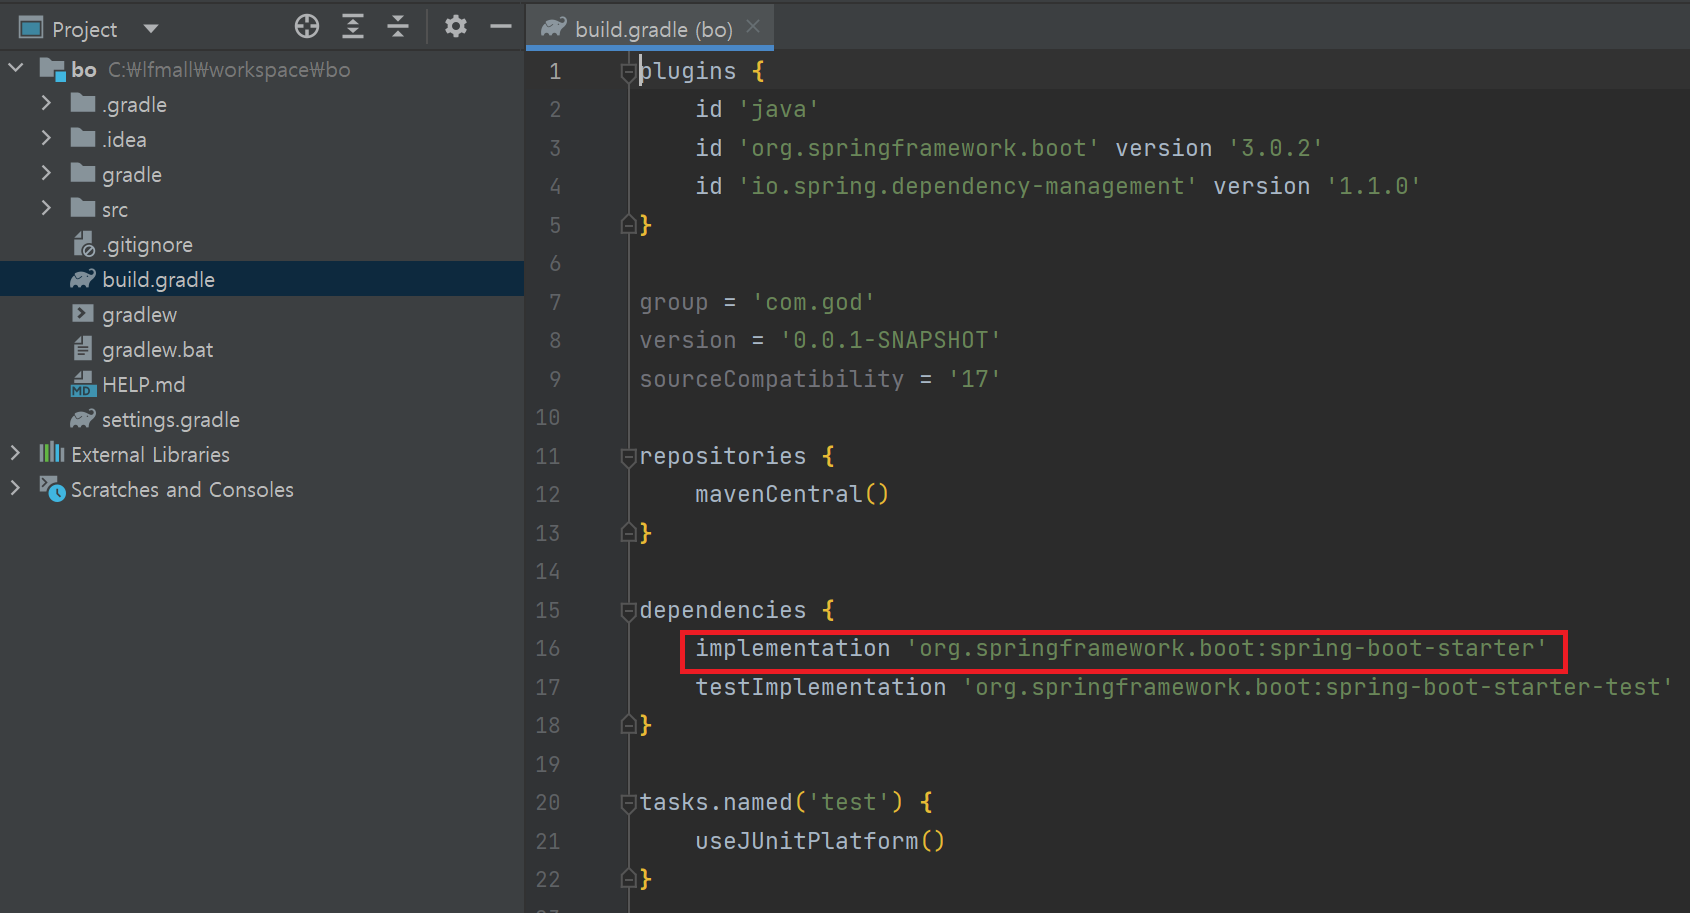
- build.gradle
plugins {
	id 'java'
	id 'org.springframework.boot' version '3.0.2'
	id 'io.spring.dependency-management' version '1.1.0'
}

group = 'com.god'
version = '0.0.1-SNAPSHOT'
sourceCompatibility = '17'

repositories {
	mavenCentral()
}

dependencies {
	implementation 'org.springframework.boot:spring-boot-starter-web'
	testImplementation 'org.springframework.boot:spring-boot-starter-test'
}

tasks.named('test') {
	useJUnitPlatform()
}
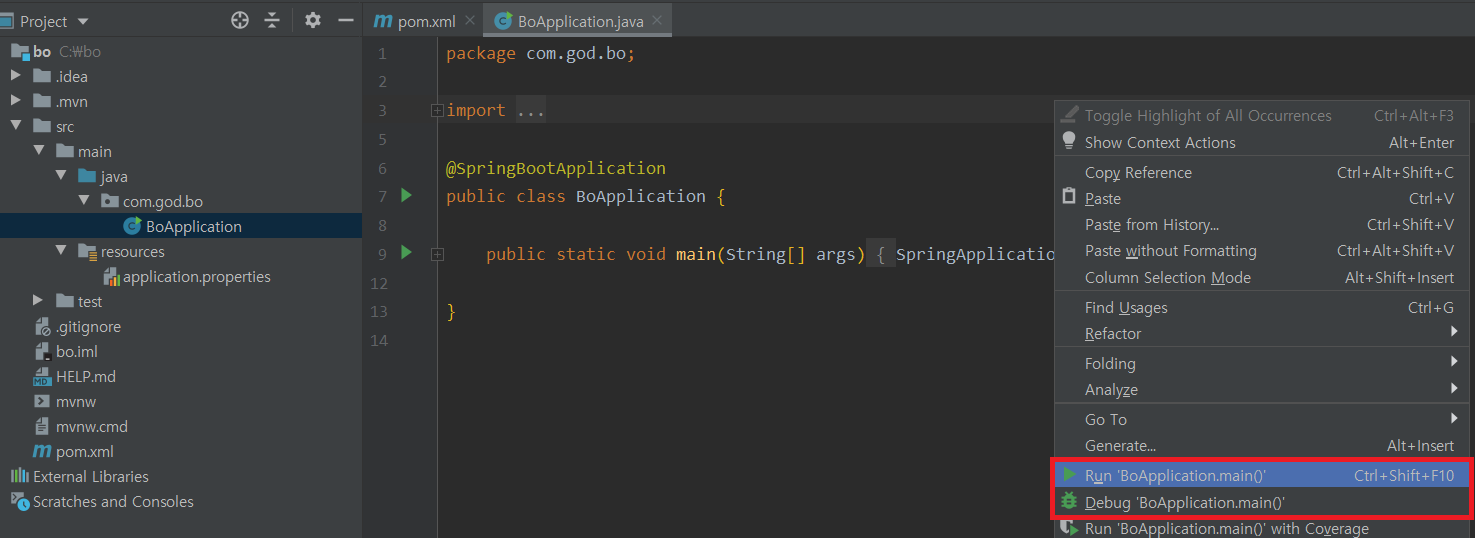
- Application.java 소스를 확인해 보면 @SpringBootApplication 이란 어노테이션이 선언되어 있는 것을 확인할 수 있다.
★ 3.1 @SpringBootApplication
- 해당 어노테이션 하나가 @EnableAutoConfiguration, @ComponentScan, @Configuration을 하나로 묶어 놓은 거라고 볼 수 있다.
- 스프링부트를 기동하기 위해서는 main 메소드가 필요한데 여기에SpringApplication.run(BoApplication.class, args); 이 부분이 들어 간다.
- 해당 annotation을 설정한 클래스가 있는 package를 최상위 패키지로 인식하고 ComponentScan을 수행하기 때문에 해당 어노테이션이 있는 클래스의 파일 위치또한 중요하다.
- 그럼 메인 메서드를 실행 해보자.
C:\work\jdk\corretto-17.0.6\bin\java.exe -agentlib:jdwp=transport=dt_socket,address=127.0.0.1:6932
Picked up JAVA_TOOL_OPTIONS: -Djava.net.preferIPv4Stack=true
OpenJDK 64-Bit Server VM warning: Options -Xverify:none and -noverify were deprecated in JDK 13 and will likely be removed in a future release.
Connected to the target VM, address: '127.0.0.1:54027', transport: 'socket'

  .   ____          _            __ _ _
 /\\ / ___'_ __ _ _(_)_ __  __ _ \ \ \ \
( ( )\___ | '_ | '_| | '_ \/ _` | \ \ \ \
 \\/  ___)| |_)| | | | | || (_| |  ) ) ) )
  '  |____| .__|_| |_|_| |_\__, | / / / /
 =========|_|==============|___/=/_/_/_/
 :: Spring Boot ::                (v3.0.2)

2023-02-15T18:15:01.949+09:00  INFO 6932 --- [           main] com.god.bo.BoApplication                 : Starting BoApplication on DESKTOP-9F838L4 with PID 6932 (C:\bo\target\classes started by dedur in C:\bo)
2023-02-15T18:15:01.949+09:00  INFO 6932 --- [           main] com.god.bo.BoApplication                 : No active profile set, falling back to default profiles: default
2023-02-15T18:15:01.949+09:00  INFO 6932 --- [           main] o.s.b.w.embedded.tomcat.TomcatWebServer  : Tomcat initialized with port(s): 8080 (http)
2023-02-15T18:15:01.949+09:00  INFO 6932 --- [           main] o.apache.catalina.core.StandardService   : Starting service [Tomcat]
2023-02-15T18:15:01.949+09:00  INFO 6932 --- [           main] org.apache.catalina.core.StandardEngine  : Starting Servlet engine: [Apache Tomcat/9.0.33]
2023-02-15T18:15:01.949+09:00  INFO 6932 --- [           main] o.a.c.c.C.[Tomcat].[localhost].[/]       : Initializing Spring embedded WebApplicationContext
2023-02-15T18:15:01.949+09:00  INFO 6932 --- [           main] o.s.web.context.ContextLoader            : Root WebApplicationContext: initialization completed in 4733 ms
2023-02-15T18:15:01.949+09:00  INFO 6932 --- [           main] o.s.s.concurrent.ThreadPoolTaskExecutor  : Initializing ExecutorService 'applicationTaskExecutor'
2023-02-15T18:15:01.949+09:00  INFO 6932 --- [           main] o.s.b.w.embedded.tomcat.TomcatWebServer  : Tomcat started on port(s): 8080 (http) with context path ''
2023-02-15T18:15:01.949+09:00  INFO 6932 --- [           main] com.god.bo.BoApplication                 : Started BoApplication in 7.114 seconds (JVM running for 8.774)
서버가 기동된 것을 볼 수 있다.
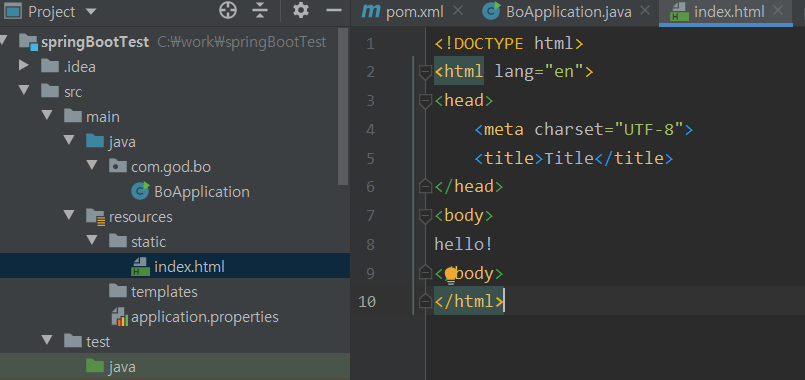
- 서버는 기동 되었지만, 현재 표현할 페이지가 없다.
- resources > static 하위에 index.html 파일을 생성 해보자.
- 그리고 다시 서버를 기동하면 내가 생성한 index.html 파일이 열리는 것을 볼 수 있다.
(http://localhost:8080/index.html)
원리는 다음과 같다.
★ 4.1 정적 리소스
- Spring Boot 프로젝트는 별도의 커스터마이징이 없는 경우 정적 리소스의 위치는 다음과 같다.
◎ static
◎ public
◎ resources
◎ META-INF/resources
ex) META-INF/resources/test/test.txt 경로에 파일이 위치할 경우 HTTP 상의 요청 주소는 /test/test.txt 이다.
이로서 정말 기본적인 스프링 부트 설정이 끝났다.
▶ Error Case1
- Process finished with exit code 0
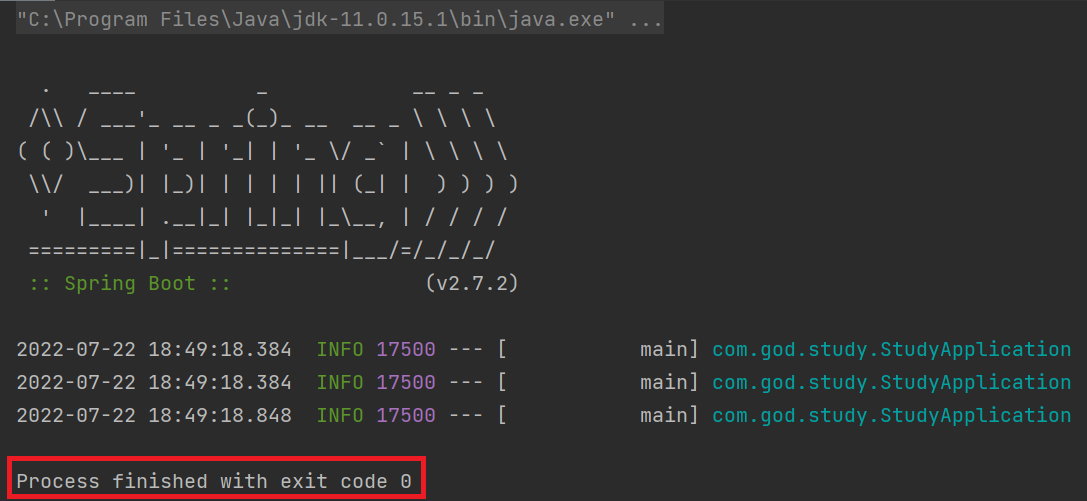
- 이런 경우 다음 라이브리러가 잘 추가 되어있는지 확인해 보자.
ex) maven
<dependency>
	<groupId>org.springframework.boot</groupId>
	<artifactId>spring-boot-starter-web</artifactId>
</dependency>
ex) gradle
dependencies {
    implementation 'org.springframework.boot:spring-boot-starter-web'
}
- 안되어 있는 경우, 추가해준 후 Maven 및 Gradle 리로드 하고 확인해 보자.
▶ Error Case2
- No matching variant of org.springframework.boot:spring-boot-gradle-plugin:3.0.x was found
- java version이 맞지 않는 경우이다.
A problem occurred configuring root project 'bo'.
> Could not resolve all files for configuration ':classpath'.
   > Could not resolve org.springframework.boot:spring-boot-gradle-plugin:3.0.2.
     Required by:
         project : > org.springframework.boot:org.springframework.boot.gradle.plugin:3.0.2
      > No matching variant of org.springframework.boot:spring-boot-gradle-plugin:3.0.2 was found. The consumer was configured to find a runtime of a library compatible with Java 11, packaged as a jar, and its dependencies declared externally, as well as attribute 'org.gradle.plugin.api-version' with value '7.6' but:
          - Variant 'apiElements' capability org.springframework.boot:spring-boot-gradle-plugin:3.0.2 declares a library, packaged as a jar, and its dependencies declared externally:
              - Incompatible because this component declares an API of a component compatible with Java 17 and the consumer needed a runtime of a component compatible with Java 11
              - Other compatible attribute:
                  - Doesn't say anything about org.gradle.plugin.api-version (required '7.6')
          - Variant 'javadocElements' capability org.springframework.boot:spring-boot-gradle-plugin:3.0.2 declares a runtime of a component, and its dependencies declared externally:
              - Incompatible because this component declares documentation and the consumer needed a library
              - Other compatible attributes:
                  - Doesn't say anything about its target Java version (required compatibility with Java 11)
                  - Doesn't say anything about its elements (required them packaged as a jar)
                  - Doesn't say anything about org.gradle.plugin.api-version (required '7.6')
          - Variant 'mavenOptionalApiElements' capability org.springframework.boot:spring-boot-gradle-plugin-maven-optional:3.0.2 declares a library, packaged as a jar, and its dependencies declared externally:
              - Incompatible because this component declares an API of a component compatible with Java 17 and the consumer needed a runtime of a component compatible with Java 11
              - Other compatible attribute:
                  - Doesn't say anything about org.gradle.plugin.api-version (required '7.6')
          - Variant 'mavenOptionalRuntimeElements' capability org.springframework.boot:spring-boot-gradle-plugin-maven-optional:3.0.2 declares a runtime of a library, packaged as a jar, and its dependencies declared externally:
              - Incompatible because this component declares a component compatible with Java 17 and the consumer needed a component compatible with Java 11
              - Other compatible attribute:
                  - Doesn't say anything about org.gradle.plugin.api-version (required '7.6')
          - Variant 'runtimeElements' capability org.springframework.boot:spring-boot-gradle-plugin:3.0.2 declares a runtime of a library, packaged as a jar, and its dependencies declared externally:
              - Incompatible because this component declares a component compatible with Java 17 and the consumer needed a component compatible with Java 11
              - Other compatible attribute:
                  - Doesn't say anything about org.gradle.plugin.api-version (required '7.6')
          - Variant 'sourcesElements' capability org.springframework.boot:spring-boot-gradle-plugin:3.0.2 declares a runtime of a component, and its dependencies declared externally:
              - Incompatible because this component declares documentation and the consumer needed a library
              - Other compatible attributes:
                  - Doesn't say anything about its target Java version (required compatibility with Java 11)
                  - Doesn't say anything about its elements (required them packaged as a jar)
                  - Doesn't say anything about org.gradle.plugin.api-version (required '7.6')

* Try:
> Run with --info or --debug option to get more log output.
> Run with --scan to get full insights.
- Java Version을 17 미만으로 사용하고 싶은 경우는 스프링 부트 3.0 미만으로 다운그레이드 하여 한시적으로 사용 가능할 것이다.
※ 본인의 개발 환경이 Java 17로 잘 되어있는지 점검해보자
1) build.gradle
- 해당 프로젝트의 sourceCompatibility 가 17이상으로 되어있는지 확인.

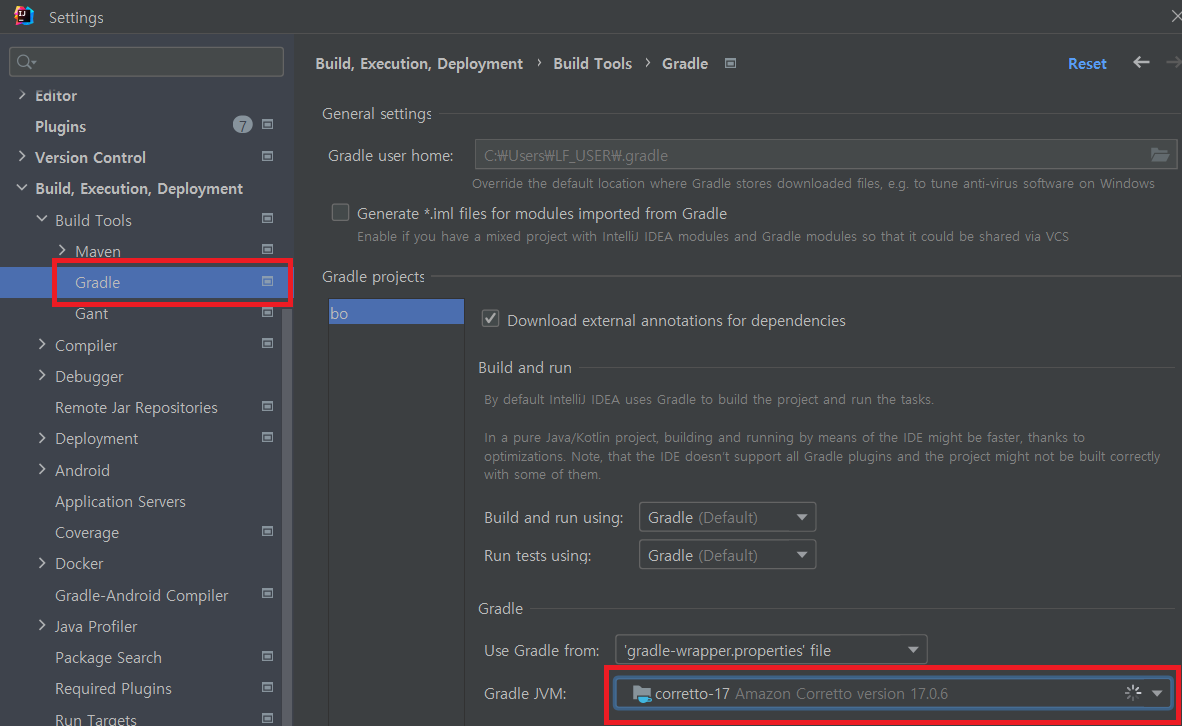
2) IDEA(Intellij) 설정 확인
- Gradle JVM (Settings > Build, Execution, Deployment > Build Tools > Gradle )
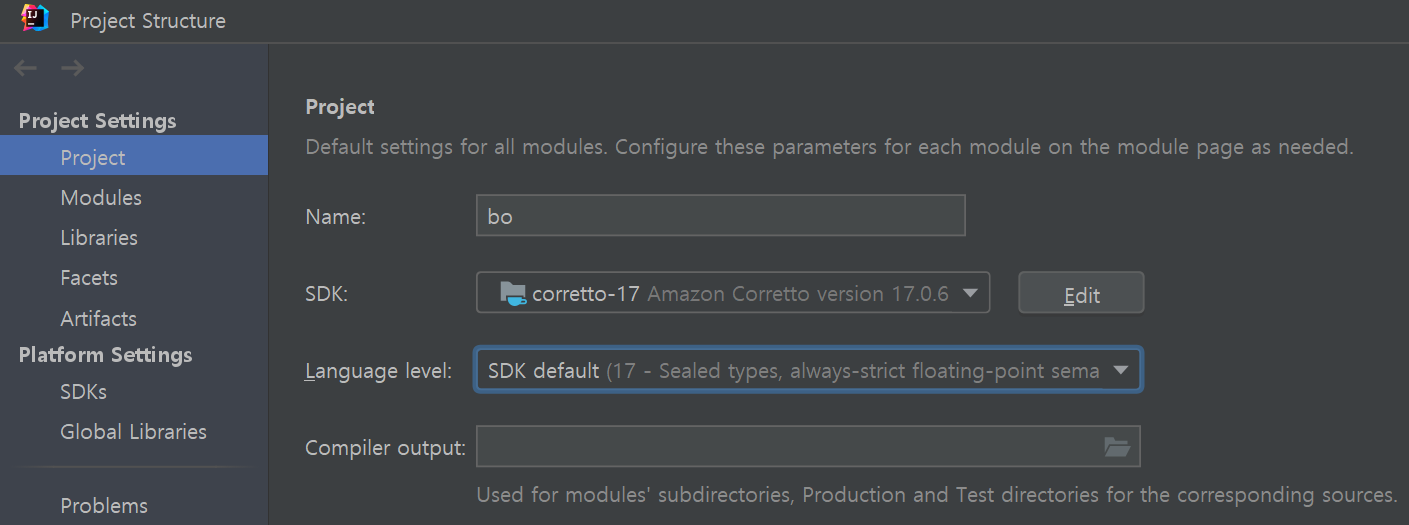
3) 프로젝트 SDK 설정
- File > Project Structure..
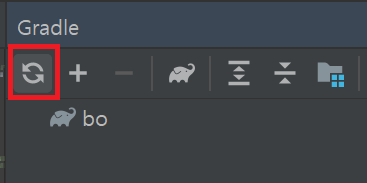
4) Gradle Refresh
- 모든 설정 변경 후 Gradle Refresh 하면 정상 적으로 빌드하는것을 볼 수 있다.
▶ 기록용
- 참고(2020. 4월 설정 시 initializr - 2.2.6)
ex) Maven 으로 설정방법

▶ pom.xml 설정하기
- Spring Proejct를 직접 설정 해보신분들은 다음과 같이 한번 세팅해보면, Spring Boot의 설정 방법이 얼마나 스프링과 비교하여 간단한지 알 수 있을 것이다.
※ 폼설정에 대해 좀더 자세히 포스팅 해두었으니, 아래 포스팅 참고!
https://goddaehee.tistory.com/199
★ 2.1 Spring Boot Starter Parent
- 스프링부트(SpringBoot)에 필요한 dependency를 자동으로 추가하여 준다.
- spring-boot-starter-parent 아티팩트를 parent 태그에 명시하면 spring-boot-dependencies-x.x.x.RELEASE.pom 파일이 상속된다.
이에 사용자가 특별히 명시하지 않아도 스프링 부트에서 제공하는 의존성이 자동적으로 설정된다.
- 프로젝트 설정시 다양한 라이브러리를 사용하게되고, 버전 충돌문제가 늘 발생 한다.
starter-parent는 의존성 조합간의 충돌 문제가 없는 검증 된 버전정보 조합을 제공하여 충돌 문제를 해결하여 준다.
- 만일 spring-boot-starter-parent 로 상속받은 설정 정보를 다시 재정의하고 싶으면 다음과 같이 properties 태그에 명시하면 된다.
깃헙이나 메이븐 리파지토리 사이트에서 상세 버전정보 조합을 확인 할 수 있다.
- Maven repository - spring-boot-stater-parent
- GitHub - spring-boot-stater-parent
<parent>
	<groupId>org.springframework.boot</groupId>
	<artifactId>spring-boot-starter-parent</artifactId>
	<version>2.2.4.RELEASE</version>
</parent>
★ 2.1 spring-boot-starter-web
- Spring MVC를 사용한 RESTful서비스를 개발하는데 사용.
★ 2.2 spring-boot-starter-test
- Junit, Hamcrest, Mockito를 포함하는 스프링 어플리케이션을 테스트 가능하도록 한다.
<dependencies>
    <dependency>
        <groupId>org.springframework.boot</groupId>
        <artifactId>spring-boot-starter-web</artifactId>
    </dependency>
    <dependency>
        <groupId>org.springframework.boot</groupId>
        <artifactId>spring-boot-starter-test</artifactId>
        <scope>test</scope>
        <exclusions>
            <exclusion>
                <groupId>org.junit.vintage</groupId>
                <artifactId>junit-vintage-engine</artifactId>
            </exclusion>
        </exclusions>
    </dependency>
</dependencies>
일단 프로젝트에 필요한 최소한의 폼 설정으로 진행하고자 다음과 같이 최종적으로 폼 설정을 정리 하였다.
<?xml version="1.0" encoding="UTF-8"?>
<project xmlns="http://maven.apache.org/POM/4.0.0" xmlns:xsi="http://www.w3.org/2001/XMLSchema-instance"
	xsi:schemaLocation="http://maven.apache.org/POM/4.0.0 https://maven.apache.org/xsd/maven-4.0.0.xsd">
	<modelVersion>4.0.0</modelVersion> <!--POM model의 버전-->
	<parent> <!--프로젝트의 계층 정보-->
		<groupId>org.springframework.boot</groupId>
		<artifactId>spring-boot-starter-parent</artifactId>
		<version>2.2.6.RELEASE</version>
		<relativePath/> <!-- lookup parent from repository -->
	</parent>
	<groupId>com.god</groupId> <!--프로젝트를 생성하는 조직의 고유 아이디를 결정한다. 일반적으로 도메인 이름을 거꾸로 적는다.-->
	<artifactId>bo</artifactId> <!--프로젝트 빌드시 파일 대표이름 이다. groupId 내에서 유일해야 한다.Maven을 이용하여 빌드시 다음과 같은 규칙으로 파일이 생성 된다.
		artifactid-version.packaging. 위 예의 경우 빌드할 경우 bo-0.0.1-SNAPSHOT.war 파일이 생성된다.-->
	<version>0.0.1-SNAPSHOT</version> <!--프로젝트의 현재 버전, 프로젝트 개발 중일 때는 SNAPSHOT을 접미사로 사용-->
	<packaging>war</packaging> <!--패키징 유형(jar, war, ear 등)-->
	<name>bo</name> <!--프로젝트, 프로젝트 이름-->
	<description>Demo project for Spring Boot</description> <!--프로젝트에 대한 간략한 설명-->
	<url>http://goddaehee.tistory.com</url> <!--프로젝트에 대한 참고 Reference 사이트-->

	<properties>
	<!-- 버전관리시 용이 하다. ex) 하당 자바 버전을 선언 하고 dependencies에서 다음과 같이 활용 가능 하다.
	<version>${java.version}</version> -->
		<java.version>1.8</java.version>
	</properties>

	<dependencies> <!--dependencies태그 안에는 프로젝트와 의존 관계에 있는 라이브러리들을 관리 한다.-->
		<dependency>
			<groupId>org.springframework.boot</groupId>
			<artifactId>spring-boot-starter-web</artifactId>
		</dependency>

		<dependency>
			<groupId>org.springframework.boot</groupId>
			<artifactId>spring-boot-starter-test</artifactId>
			<scope>test</scope>
			<exclusions>
				<exclusion>
					<groupId>org.junit.vintage</groupId>
					<artifactId>junit-vintage-engine</artifactId>
				</exclusion>
			</exclusions>
		</dependency>
	</dependencies>

	<build> <!--빌드에 사용할 플러그인 목록-->
		<plugins>
			<plugin>
				<groupId>org.springframework.boot</groupId>
				<artifactId>spring-boot-maven-plugin</artifactId>
			</plugin>
		</plugins>
	</build>

</project>
| [스프링부트 (12)] SpringBoot 에러 페이지 설정(Custom Error Page) (2) | 2020.03.04 |
|---|---|
| [스프링부트 (11)] SpringBoot YAML 적용하기(properties vs yaml) (1) | 2020.03.02 |
| [스프링부트 (10)] SpringBoot Test(3) - 단위 테스트(@WebMvcTest, @DataJpaTest, @RestClientTest 등) (2) | 2020.02.29 |
| [스프링부트 (9)] SpringBoot Test(2) - @SpringBootTest로 통합테스트 하기 (1) | 2020.02.28 |
| [스프링부트 (8)] SpringBoot Test(1) - Junit 설정 및 실행 (5) | 2020.02.25 |
소중한 공감 감사합니다